What Should I Pack for Hiking in New Zealand?
We all approach the task of packing for an adventure differently. Some people will eagerly anticipate this ‘job’ and will start laying out their gear weeks in advance. They're the organized ones who know the sales staff at the local outdoor shops by name. They will probably agonize over which sleeping bag to buy based on its performance to weight ratio. They will spend hours mulling over which order to pack their stuff, so that it's convenient to retrieve yet also well balanced. They could even go as far as colour matching everything, so it's easy on the eye. The lists will get systematically ticked off and labels may even be sewn here and there so there won't be any awkward moments of confusion down the track.
If this is you, the team here at ‘Active HQ’, who have all fielded plenty of pre-trip phone calls and emails, have got preparing for a hiking mission down to a science. Check out our lists below for every hiking occasion:
There is no such thing as bad weather, only bad clothing.
The weather in New Zealand can be variable, and so when hiking, you need to make sure you're carrying the appropriate clothing. A layering system is best, where you can add or remove layers depending on the conditions at the time. Most seasoned New Zealand hikers will always be carrying a waterproof shell/Gore-Tex rain jacket or similar, even if the sun is shining when you set off, and several layers of merino wool clothing. Merino wool is a breathable and eco-friendly natural fiber that doesn’t retain odour, keeps you warm even when wet, and also wicks moisture away from your skin to keep you more comfortable while you hike. It’s no wonder most Kiwis (and all those sheep!) wear merino wool outdoors.
On some of the "scenic" walks you might see people wearing all manner of shoes on their feet, but all too-often people are caught out using inadequate footwear, and we would recommend always using a closed shoe – no sandals or flip-flops! On day hikes, some people are comfortable wearing trail-running or "approach" shoes, but for longer trails, a proper leather or fabric/Gore-Tex hiking boot is required.
10 easy steps to help you pack for a multi-day hiking trip:
So you're taking on your first multi-day hiking mission – ever? In the last 5 years? Or since you were at school? Well, you may be a little rusty, or you may just want to know how the experts do it! We all have a special packing system that helps us navigate our way around our backpacks easily and effortlessly, always able to find those snacks when the mood is running low, or to easily grab a water bottle, but if you're new to this or you're out of practice then this guide is for you.
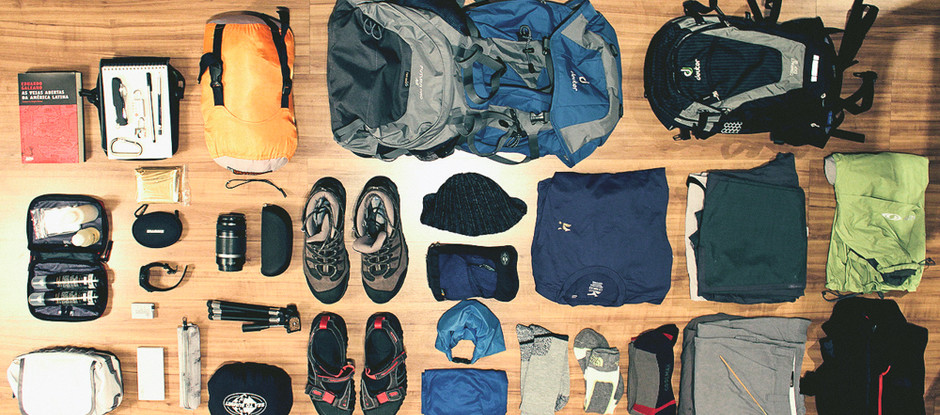
- GEAR LIST - First up, you're going to need a gear list, a space to lay out your stuff and patience to run around trying to find everything.
- LINE YOUR PACK - If you're going to be trekking outdoors, and let's assume we all are because if you're not getting outside then clearly something is wrong, then you need to be prepared for the fact that it may rain. Therefore, the first thing you need to do is ensure your pack is lined to protect your spare clothes and other bits and bobs from getting wet – no one wants wet gear, plus it makes your pack heavier. You can use anything from a dry bag down to a normal plastic bag if the budget is tight. Heavy duty garbage bags are also a good bet.
- STAY ORGANISED - Not only do these inner bags help protect from the rain, but they also help keep everything in your pack organised – another key to packing!
- BULKY ITEMS IN FIRST - Once your pack is lined, group everything heavy or bulky together – sleeping bag and tent if you're taking them, your spare clothes and undies, socks, down jacket (not your waterproof – keep that for the top) and camping cooker. Any of these heavy things, shove them in first. The middle of you is your most stable bit, and the bottom of your pack will be sitting round your waist, so heavy stuff goes in first. Top tip – get out all the clothes you think you need, half it, and then put them in your bag leaving the other half behind. Think lightweight, quick drying, non-cotton clothing. It's the best for hiking.
- FOOD - Next up, food – if you're carrying your food, then it needs to go in the middle above the bulky items. Don't carry tins or anything heavy, because you'll regret it after about 30 minutes. You can do without it! Think about buying some dehydrated camping meals as they are very light and they'll taste great in the outdoors (not so much if you cook them up at home – this is the magic of the wilderness at work). You need high calorie light weight food to fuel your body. Always take chocolate for pudding. This is my advice. Ignore at your peril.
- WATERPROOF – now is time to chuck in your waterproofs – pants and jackets if it's cold. They need to be near the top so you can easily grab them out in case of a shower, or torrential downpour, without having to get everything else out at the same time. There's nothing more refreshing than a shower – and it can be fun to be out in it, as long as you're prepared!
- SNACKS, CAMERA AND WATER – All in the top and side pockets for easy access! You need to eat plenty of snacks on your way – trail mix made up of nuts, chocolate and dried fruit is perfect. As are things like Mars and Snickers bars – and these are great in an emergency too so keep a couple separate just in case. Another old favourite are boiled sweets to keep your spirits up at the end of the day, and jelly beans are yummy too. Make sure you can get to your camera often to capture the memories of your trip, and water either in a bladder or bottle should always be easily accessible. Drinking little and often is the key.
- FIRST AID KIT – be prepared! The roof of your pack is a perfect place to keep your first aid kit. You'll need a good compact kit with plasters, blister kit, bandage, scissors, painkillers, sling and antiseptic cream.
- AT THE TOP – you should be well packed now, so fold the waterproof lining over the top of your gear, or do up your dry bags, and close your pack up tight.
- LOOKING GOOD - When you're packed up, straps pulled tight and adjustments made, it should look nice! It should look well packed; with nothing hanging off or sticking out and the straps should all be fastened and tucked in. Once it's looking nice, you're ready to haul it onto your back and begin your hiking adventure.